Bryan Cantrill in BSD Now podcast
The lastest episode of BSD Now (103) podcast brought in a fantastic and hilarious interview with Bryan Cantrill who is well known for his wit and right on the bullseye rants. It’s been awhile since I cried laughing so unquestionably this video is a highly recommended. Not to mention that his talk was very educational both from the technical (epoll, kqueue) and historical point of views. Bookmarked and added to the favorites.
In: FreeBSD, Solaris, Sun
AWS FreeBSD instance won’t come up. Screams for manual fsck.
This is a short write up if after a reset or a reboot your FreeBSD (or Linux) instance doesn’t come online, stalls and
“aws ec2 get-console-output” returns something like that among its lines:
UNEXPECTED INCONSISTENCY; RUN fsck MANUALLY.
- Just power-off the faulty instance either from Web interface or using cli:
aws ec2 stop-instances --instance your_instance_id
- Again, using Web interface or cli (if you know its id) detach volume the root filesystem lives on.
aws ec2 detach-volume --volume-id faulty_volume_id --instance your_instance_id
- Create a new minimal instance and attach the volume that was detached during the previous step.
- Boot it up and simply run fsck manually as advised.
For FreeBSD you will have to add an entry into /etc/fstab otherwise fsck would complain:# fsck -y /dev/xbd5a fsck: Could not determine filesystem type
In my case I just add a single line:
echo "/dev/xbd5a /mnt ufs rw 1 1" >> /etc/fstab
- After that, just do the reverse: detach the volume and connect it back to your main instance and power it up.
Hope everything is golden at this point.
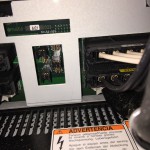
How to power off USP-V when it doesn’t want to
In the era of VSP G1000 this post may sound dated but I still hope that it would help some poor sole in the same situation I was sometime ago. The task was laughably simple: power off USP-V, power it up just to make sure it still could boot up flawlessly and shut it down again. All went nice and dandy till the final step – the ultimate power off. So I opened DKC panel and switched simultaneously two switches: PS-ENABLE and PS-OFF (all in accordance with the maintenance manual).

So far so good. During the first power off iteration it took the array (DKC and one DKU) roughly 15-20 minutes to cut off the power from its components so switches on AC boxes could be turned into OFF position. But not this time… After waiting for one hour and a half the system was still up. However, and thankfully the disks had been spun down successfully. That opened a door for a forceable shut down procedure. Which is simple and straightforward as a samurai’s sword.
- Open DKC panel and unscrew it as shown on the picture below.
- Pay attention to the jumpers. We will be using JP3 which is right above JP2.
- If you don’t have a jumper (I didn’t have one) there is also a workaround. Go to the back of a DKU, open its door and at the bottom there is a recess with another set of jumpers.
- It is save to pick and pull out any of these jumpers (remember that the disks had to be powered off before that).
I’ve been told that these jumpers define the physical position of a DKU rack relatively to a DKC (is it on the left or right and how far DKU-R1, DKU-L1, etc.) - Once you have a jumper put it into JP3 in the DKC panel and turn CHK RST switch on but pressing on its upper half.
- A moment after that the array would be shut down.


Configuring FCoE in Linux (RHEL) and HP FlexFabric
Actually it’s easy. Very easy indeed, like going 1, 2, 3.
- Collect information about MAC addresses to distinguish pure Ethernet NICs and CNA that will pass FCoE traffic. The latter have both MAC and WWN addresses.
- Power on a server and update /etc/udev/rules.d/70-persistent-net.rules if required.
- Activate new dev rules:
# udevadm trigger
- Install fcoe-utils and lldpad packages:
# yum install fcoe-utils.x86_64
- Rename /etc/fcoe/cfg-ethx file using the name of you CNAs. For example, if eth5 is your CNA interface, then:
# cp /etc/fcoe/cfg-ethx /etc/fcoe/cfg-eth5
- Edit /etc/fcoe/cfg-ethX files and set DCB_REQUIRED=”yes” to DCB_REQUIRED=”no”
- Start FCoE and LLDPAD services and set adminStatus to disable for ALL Broadcom-based CNA interfaces as stated by HP. Please note, that
…In a FlexFabric environment, LLPAD must be disabled on all network adapters…
# chkconfig lldpad on # chkconfig fcoe on # service lldpad start # service fcoe start # for d in `ip link ls | grep mtu | awk -F \: '{print $2}'`; do lldptool set-lldp -i $d adminStatus=disabled; done # cp /etc/fcoe/cfg-ethx /etc/fcoe/cfg-eth5 - Create Ethernet configuration file for all CNA iterfaces to make sure they will be brought online after reboot:
DEVICE=eth5
ONBOOT=yes
BOOTPROTO=none
USERCTL=NO
MTU=9000
- Run ifup to bring FCoE interfaces up. If everything is OK reboot the server as a final test and start enjoying FCoE.
# ifup eth5
- Why MTU=9000? Because FC payload is 2,112 bytes jumbo frames must be turned on to avoid unnecessary IP fragmentation.
Solaris checkinstall script did not complete successfully
This is another post about the usefulness of reading man pages and READMEs.
The other day I was patching a Solaris box and was greeted with the following error:
This appears to be an attempt to install the same architecture and version of a package which is already installed. This installation will attempt to overwrite this package.
/some_long_path_to/install/checkinstall: /some_long_path_to//install/checkinstall: cannot open
pkgadd: ERROR: checkinstall script did not complete successfully
Dryrun complete.
No changes were made to the system.
I was beating my head against the wall for quite a while before I decided to give “man patchadd” a try. Thankfully, the helpful paragraph was found in a wink of an eye:
pkgadd is invoked by patchadd and executes the installation scripts in the pkg/install directory. The checkinstall script is executed with its ownership set to user install, if there is no user install then pkgadd executes the checkinstall script as noaccess. The SVR4 ABI states that the checkinstall shall only be used as an information gathering script. If the permissions for the checkinstall script are changed to something other than the initial settings, pkgadd may not be able to open the file for reading, thus causing the patch installation to abort with the following error:
pkgadd: ERROR: checkinstall script did not complete successfully.
There is no need to tell, that after the patch was moved to another directory where user noaccess (didn’t have user install) had enough permissions the problem had gone.
Have safe and flawless patching!
OpenSSL TLS 1.1 and wrong version number
If you, like myself, have been living under a rock you’d be also surprised to know that OpenSSL didn’t support TLSv1.1 and TLSv1.2 until version 1.0.1 .
Found out that accidently by trying to disable TLSv1 in Nginx which was running on a RHEL5 box with OpenSSL 0.9.8e. Below is how TLS handshake looked when TLSv1.1 was deliberately requested:
$ openssl s_client -host some_host_name_here -port 443 -tls1_1 -state -msg
CONNECTED(00000003)
SSL_connect:before/connect initialization
>>> TLS 1.1 Handshake [length 0096], ClientHello
    01 00 00 92 03 02 54 e6 ea 6b bc f9 c7 bc 47 4e
    da a9 74 2e c8 27 c4 90 18 94 eb cf 21 40 ef 11
    fe 09 a0 38 bf 2a 00 00 4c c0 14 c0 0a 00 39 00
    38 00 88 00 87 c0 0f c0 05 00 35 00 84 c0 13 c0
    09 00 33 00 32 c0 12 c0 08 00 9a 00 99 00 45 00
    44 00 16 00 13 c0 0e c0 04 c0 0d c0 03 00 2f 00
    96 00 41 00 0a 00 07 c0 11 c0 07 c0 0c c0 02 00
    05 00 04 00 ff 01 00 00 1d 00 0b 00 04 03 00 01
    02 00 0a 00 08 00 06 00 19 00 18 00 17 00 23 00
    00 00 0f 00 01 01
SSL_connect:SSLv3 write client hello A
>>> TLS 1.0 Alert [length 0002], fatal protocol_version
    02 46
SSL3 alert write:fatal:protocol version
SSL_connect:error in SSLv3 read server hello A
140075793618760:error:1408F10B:SSL routines:SSL3_GET_RECORD:wrong version number:s3_pkt.c:337:
---
no peer certificate available
---
No client certificate CA names sent
---
SSL handshake has read 5 bytes and written 7 bytes
---
New, (NONE), Cipher is (NONE)
Secure Renegotiation IS NOT supported
Compression: NONE
Expansion: NONE
SSL-Session:
    Protocol  : TLSv1.1
    Cipher    : 0000
    Session-ID:
    Session-ID-ctx:
    Master-Key:
    Key-Arg   : None
    Krb5 Principal: None
    PSK identity: None
    PSK identity hint: None
    Start Time: 1424419435
    Timeout   : 7200 (sec)
    Verify return code: 0 (ok)
---
Linux pptp stumbling blocks that I was hit by
While configuring a pptp on a Linux box I bumped into the several smalish issues which I’d like to blog about.
- Make sure that your network engineers have enabled traffic inspection on all intermediate firewalls between tunnel’s endpoints. Otherwise LCP won’t be able to finish its configuration negotiation phase even if the control channel on TCP port 1723 was successfully established before that.
- If your are running Redhat Linux distro or any of its derivatives and want to start pptp tunnel using ifup command just do the following:
- Create a configuration file /etc/sysconfig/network-scripts/ifcfg-your_connection_name
In my case the content of the file is rather ascetic and depending on your requirements yours might have different options:
DEVICE=ppp0
ONBOOT=yes
USERCTL=yes
DEFROUTE=no
PEERDNS=no
- Make sure that your_connection_name part of /etc/sysconfig/network-scripts/ifcfg-your_connection_name filename matches exactly with the one you have under /etc/ppp/peers/. Otherwise ifup simply won’t fly.
- Now you should be able to fire ip “ifup your_connection_name” and a just moment after you should have your tunnel up and running.
All you would get is the admonitions similar to the ones listed below:
pppd call connection_name debug nodetach using channel 5 Using interface ppp0 Connect: ppp0 <--> /dev/pts/2 sent [LCP ConfReq id=0x1] sent [LCP ConfReq id=0x1 ] sent [LCP ConfReq id=0x1 ] sent [LCP ConfReq id=0x1 ] sent [LCP ConfReq id=0x1 ] sent [LCP ConfReq id=0x1 ] sent [LCP ConfReq id=0x1 ] Modem hangup Connection terminated. Script pptp xxx.xxx.xxx.xxx --nolaunchpppd finished (pid 10385), status = 0x0
Just remember, that without working LCP there will be no ppp connection. Period.
Have a stable connection!
Don’t forget to apply Solaris Live Upgrade patch or …
One day you might find yourself in a similar situation as I did when I wasn’t able to create a new boot environment:
# lucreate -n SolarisFeb16 Analyzing system configuration. Comparing source boot environmentfile systems with the file system(s) you specified for the new boot environment. Determining which file systems should be in the new boot environment. Updating boot environment description database on all BEs. Updating system configuration files. The device is not a root device for any boot environment; cannot get BE ID. Creating configuration for boot environment . Source boot environment is . Creating boot environment . Cloning file systems from boot environment to create boot environment . Creating snapshot for on . Creating clone for on . Setting canmount=noauto for in zone on . ERROR: The boot environment name does not have a boot device defined in . ERROR: Root slice device Population of boot environmentdoes not have a boot device defined in .> for BE was not found: . successful. Creation of boot environment successful.
Even the last two lines say that population and creation were successful luactivate would disagree:
# luactivate SolarisFeb16 ERROR: Unable to determine the configuration of the current boot environment.
The root case was an outdated 121430-xx patch. What is more important is that this patch is not part of the Recommended Patch Cluster:
Live Upgrade patch 121430-XX is included in the patches/ directory of the patchset, but this patch will not be applied during patchset installation. The decision to apply the Live Upgrade patch is left to the user, this is done to accommodate users who wish to independently manage the version of the Live Upgrade patch on their system. Where a user wishes to apply the Live Upgrade patch, this needs to be done manually with the patchadd command.
After installing the latest 121430-93 (as of this writing) the problem has happily disappeared.
A good reminder to myself to always check README(s).
Videos from EuroBSDCon 2014
In the last episode of BSDNow podcast a link to the videos from EuroBSDCon 2014 has been published – https://va.ludost.net/files/eurobsdcon/2014/Vitosha/ The one I enjoyed most was a presentation made by Kirk McKusik about the implementation of ZFS. Worth watching indeed.
Redmine Time logging via commit checklist
Redmine has a very handy feature, called Time tracking feature, that allows you to log the time your spent working on a code via a commit message. However, it didn’t fly out-of-the-box in my case. If you find yourself in a similar situation you could take a look at the checklist below to verify that you’ve set all required options correctly. That helped me (I had redmine 2.3.4), but there is no guarantee it would work in your particular case but at least you could be sure that all knobs are in the right positions.
- Go to Administration > Settings > Projects
- Go to Administration > Settings > Repositories
- If you use git verify that your email in ~/.gitconfig matches with the email of your account in Redmine.
- Make sure that a user in Redmine has enough permissions to log spent time
- Finally, double check that you use proper keywords (remember step 2?)
- As the last resort (if you are fine with digging into a Ruby code) you could take a look at app/models/changeset.rb, especially at def scan_comment_for_issue_ids() function and add extra logging to make sure that the comment string is parsed properly and hours variable is not empty:
comments.scan(/([\s\(\[,-]|^)((#{kw_regexp})[\s:]+)?(#\d+(\s+@#{TIMELOG_RE})?([\s,;&]+#\d+(\s+@#{TIMELOG_RE})?)*)(?=[[:punct:]]|\s|<|$)/i) do |match|
      action, refs = match[2], match[3]
      next unless action.present? || ref_keywords_any

      refs.scan(/#(\d+)(\s+@#{TIMELOG_RE})?/).each do |m|
        issue, hours = find_referenced_issue_by_id(m[0].to_i), m[2]
        if issue
          referenced_issues << issue
          fix_issue(issue) if fix_keywords.include?(action.to_s.downcase)
          log_time(issue, hours) if hours && Setting.commit_logtime_enabled?
        end
      end
Check the “Time tracking” module has been selected in “Default enabled modules for new projects”.
Also prove that it’s enable for your project by going to Project > Settings > Modules and verify that “Time tracking” is enabled there.
Make sure that “Enable time logging” check box is ticked and “Activity for logged time” is set to anything but not “Default”.
Remember what keywords are listed in the “Referencing keywords” and “Fixing keywords” fields.
The same is true not only for git but for other SVC. As a workaround you could use Repository-user-mapping To reach it, go to Project > Settings > Repositories and on the right hand side you will see three links: Users, Edit and Delete. Clicking on “Users” will forward you to a page where you could map a Redmine user to a username found in the repository log.
Go to Administration > Settings > Users and there you could check various roles and permissions which have been applied to your Redmine account, as well as the groups he/she is the member of. Look for “Time tracking” permissions:
![]()
For example:
refs #3118 @2h
Good luck!